Irresistible Rhubarb Dream Bars with 2 Secret Twists

Oh, rhubarb—there’s just something about that tangy, rosy stalk that makes desserts truly sing! I still remember the first time I tasted rhubarb dream bars at a summer potluck years back, and ever since, I’ve been hooked. That perfect sweet-and-tart combo nestled on a buttery shortbread base? Pure magic. These bars are my go-to treat when rhubarb season rolls around—they’re way easier than pie (no rolling pin needed!) yet just as impressive to serve. Trust me, one bite of the jammy rhubarb filling paired with that crisp crust, and you’ll see why I lovingly call them “dream” bars. They vanish faster than you can say “seconds, please!”
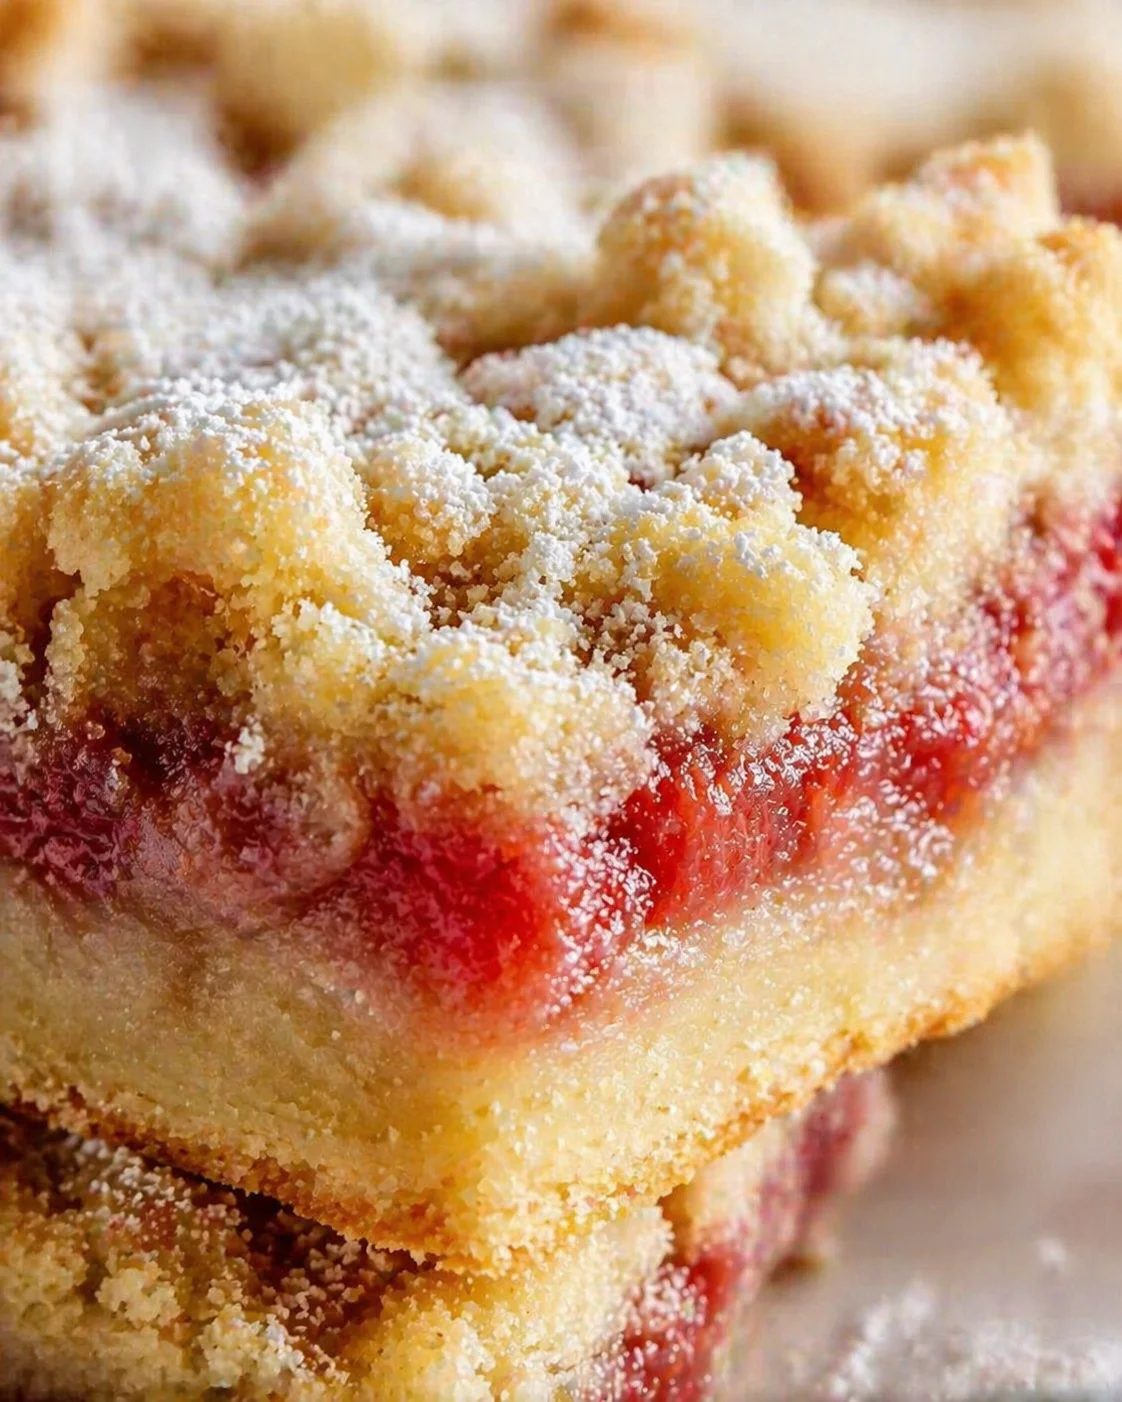
Hey there—if you’re a fan of buttery shortbread and a bright, tangy fruit filling, you’ve struck gold here. These rhubarb dream bars deliver a dessert that looks like you spent ages in the kitchen but actually comes together with hardly any fuss. Imagine just two layers: a melt-in-your-mouth shortbread crust and a sweet-tart rhubarb filling that sets up beautifully after a quick chill.
Keep reading, and I’ll walk you through everything to make these yourself: a simple three-step method that requires zero fancy tools or rolling pins, an easy ingredient list featuring pantry staples, plus my top tips for slicing clean bars, avoiding a soggy middle, and storing them so they stay fresh and tasty. Whether you’re baking for a potluck, an outdoor picnic, or just craving a little rhubarb goodness, these bars are forgiving, fast, and guaranteed to disappear in no time.
- Simple steps: easy crust, speedy filling, bake and chill—ideal for beginner bakers or anyone short on time.
- Classic taste: bright rhubarb balanced with just enough sugar resting on a buttery, flaky base.
- Perfect make-ahead: slices get neater after chilling and these bars keep well refrigerated.
What Makes Them Irresistible
Want to know why these bars might become your new favorite dessert? Let me spill the beans:
- Super easy! Just two simple layers—no fancy skills or equipment needed, I promise.
- That perfect tart-sweet punch from fresh rhubarb sweetened just right to delight your taste buds. If you crave more of that flavor, try this classic rhubarb crisp for a cozy, crunchy alternative.
- Buttery shortbread crust that practically melts on your tongue—honestly, it’s almost criminal how good it tastes.
- Everyone loves them—I’ve yet to meet someone who doesn’t beg me for the recipe after the first bite.
No joke, these bars tick all the boxes: effortless, flavorful, and disappearing quickly!
Ingredients for Crust and Filling
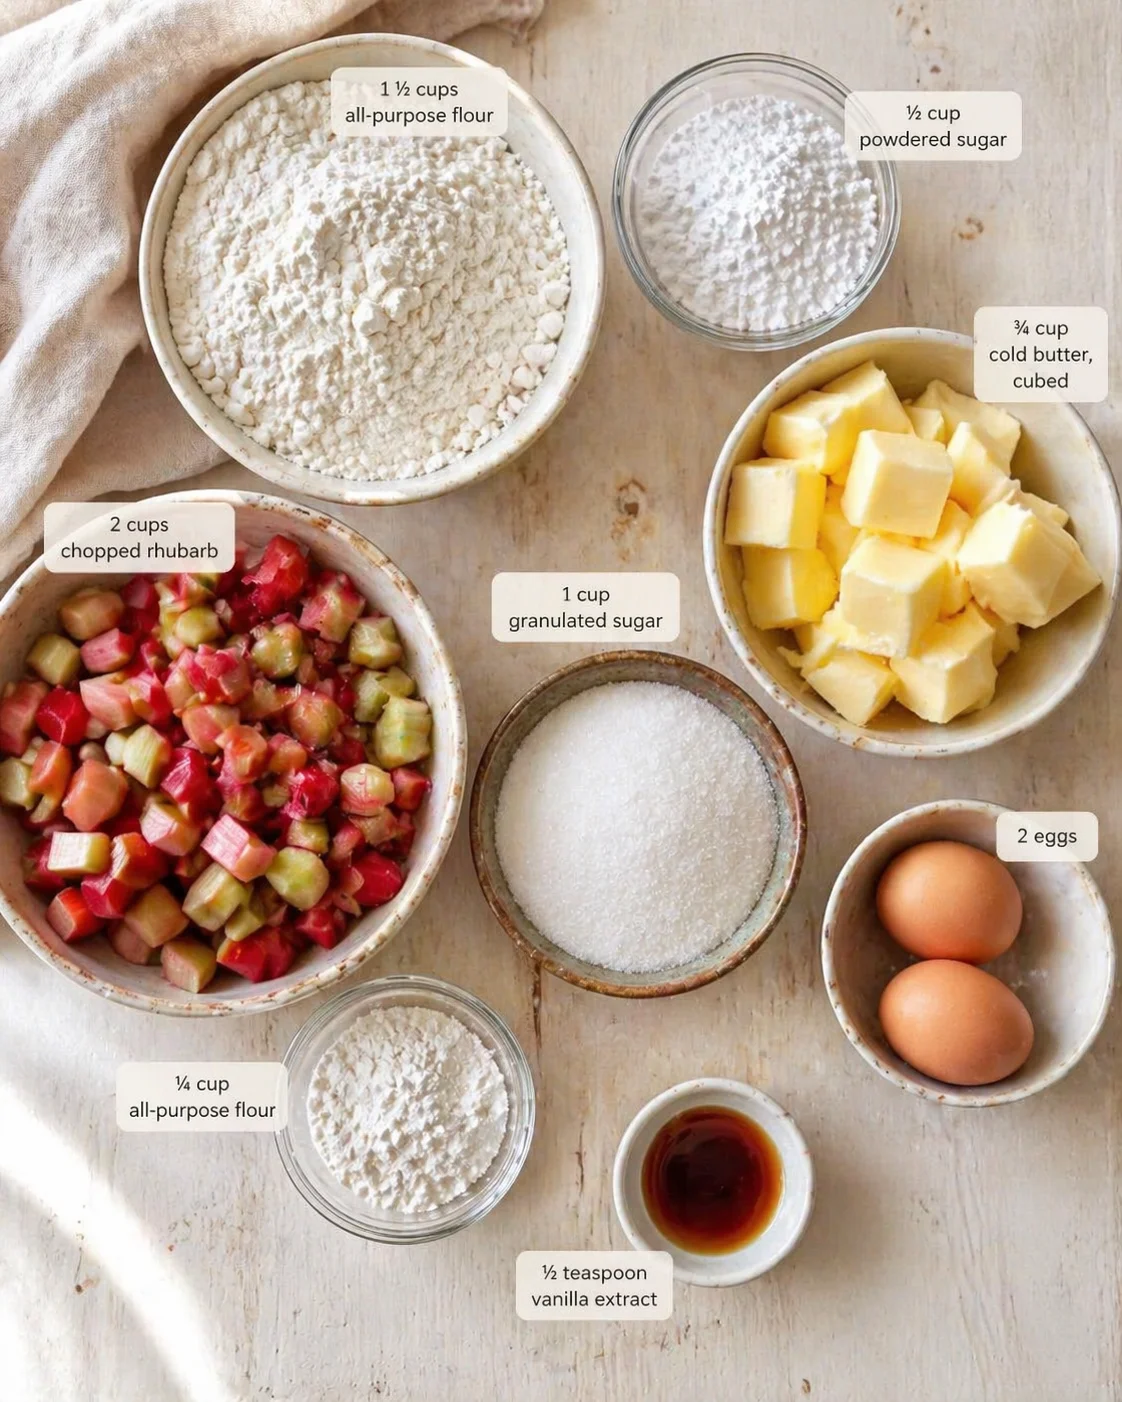
- 1 ½ cups all-purpose flour (measured spooned and leveled—for a light, tender crust)
- ½ cup powdered sugar (this is the secret to a soft, melt-in-your-mouth shortbread)
- ¾ cup cold butter, cubed (cold is key—straight from the fridge to create that flaky texture)
- 2 cups chopped rhubarb (about 4 stalks—pick the bright pink ones for best taste!)
- 1 cup granulated sugar (trust me, the sugar really balances rhubarb’s natural tanginess)
- 2 eggs (room temp works best, but cold is fine if you’re in a hurry)
- ¼ cup all-purpose flour (helps thicken the luscious fruit filling perfectly)
- ½ teaspoon vanilla extract (the little flavor boost you don’t want to skip!)
How to Assemble and Bake
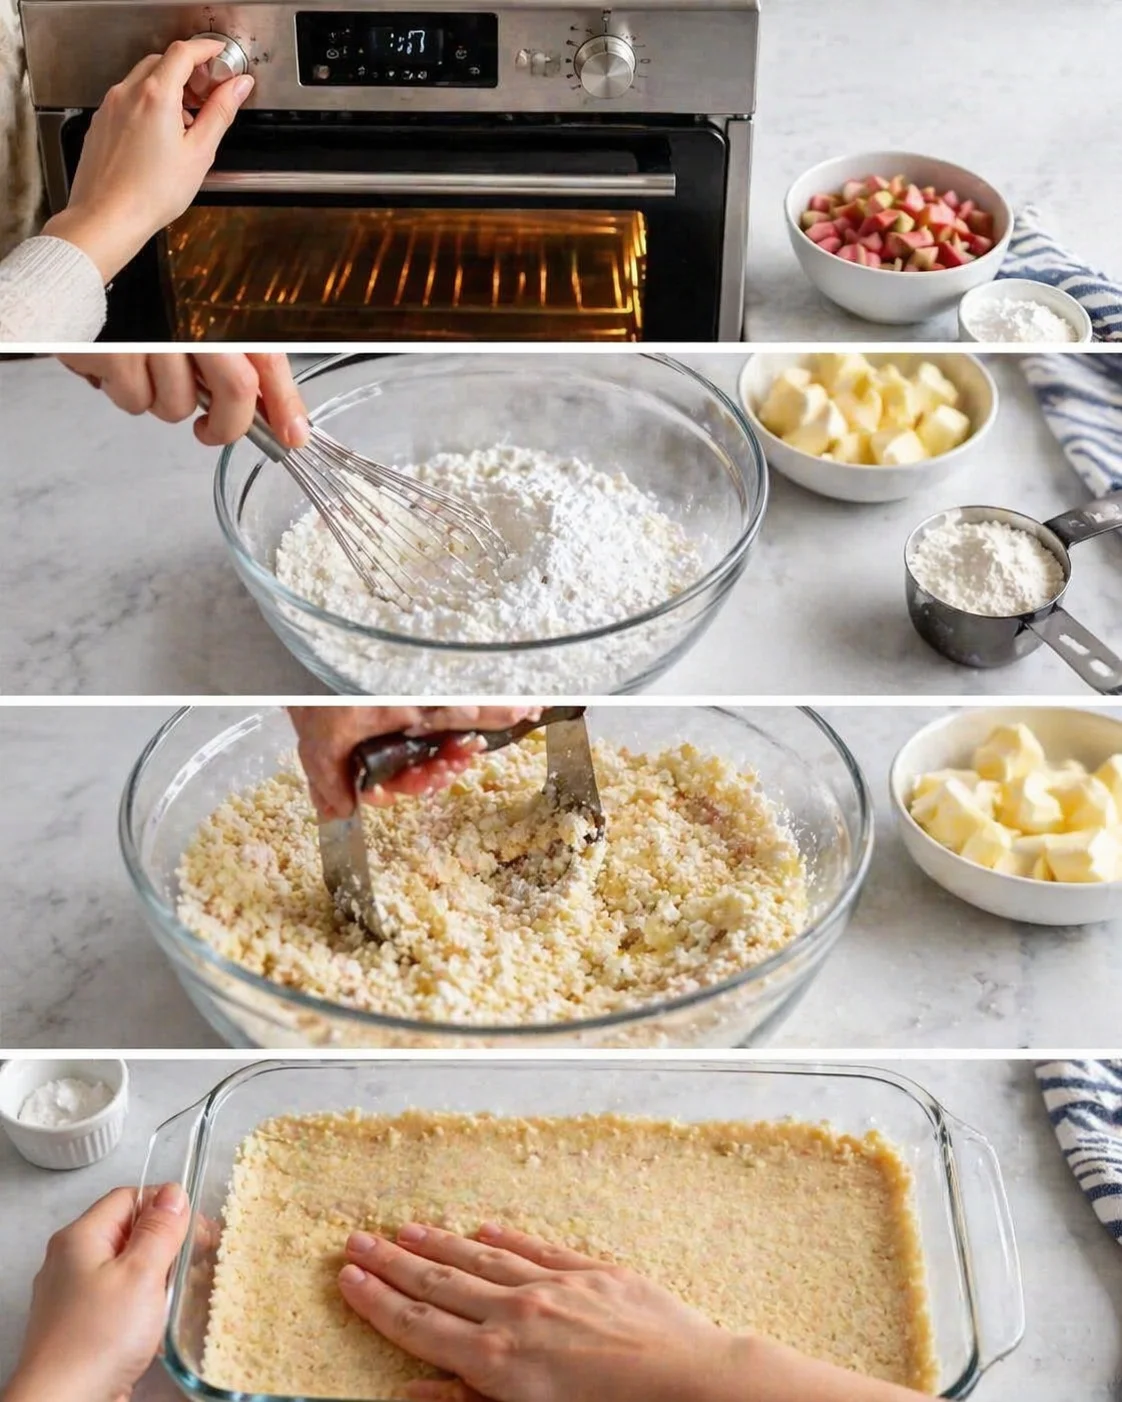
- Preheat oven to 350°F (175°C).
- Whisk 1 ½ cups all-purpose flour and ½ cup powdered sugar in a large bowl.
- Cut ¾ cup cold cubed butter into the flour mixture until coarse crumbs with pea-sized butter pieces remain.
-
Grease a 9×13-inch baking dish and firmly press the crust mixture into the bottom.
- Bake the crust for 15 minutes, until the edges start to turn golden.
- Toss 2 cups chopped rhubarb with 1 cup granulated sugar to draw out the juices.
- Lightly beat 2 eggs, then stir in ¼ cup all-purpose flour and ½ teaspoon vanilla extract.
-
Gently combine the egg mixture with the sweetened rhubarb.
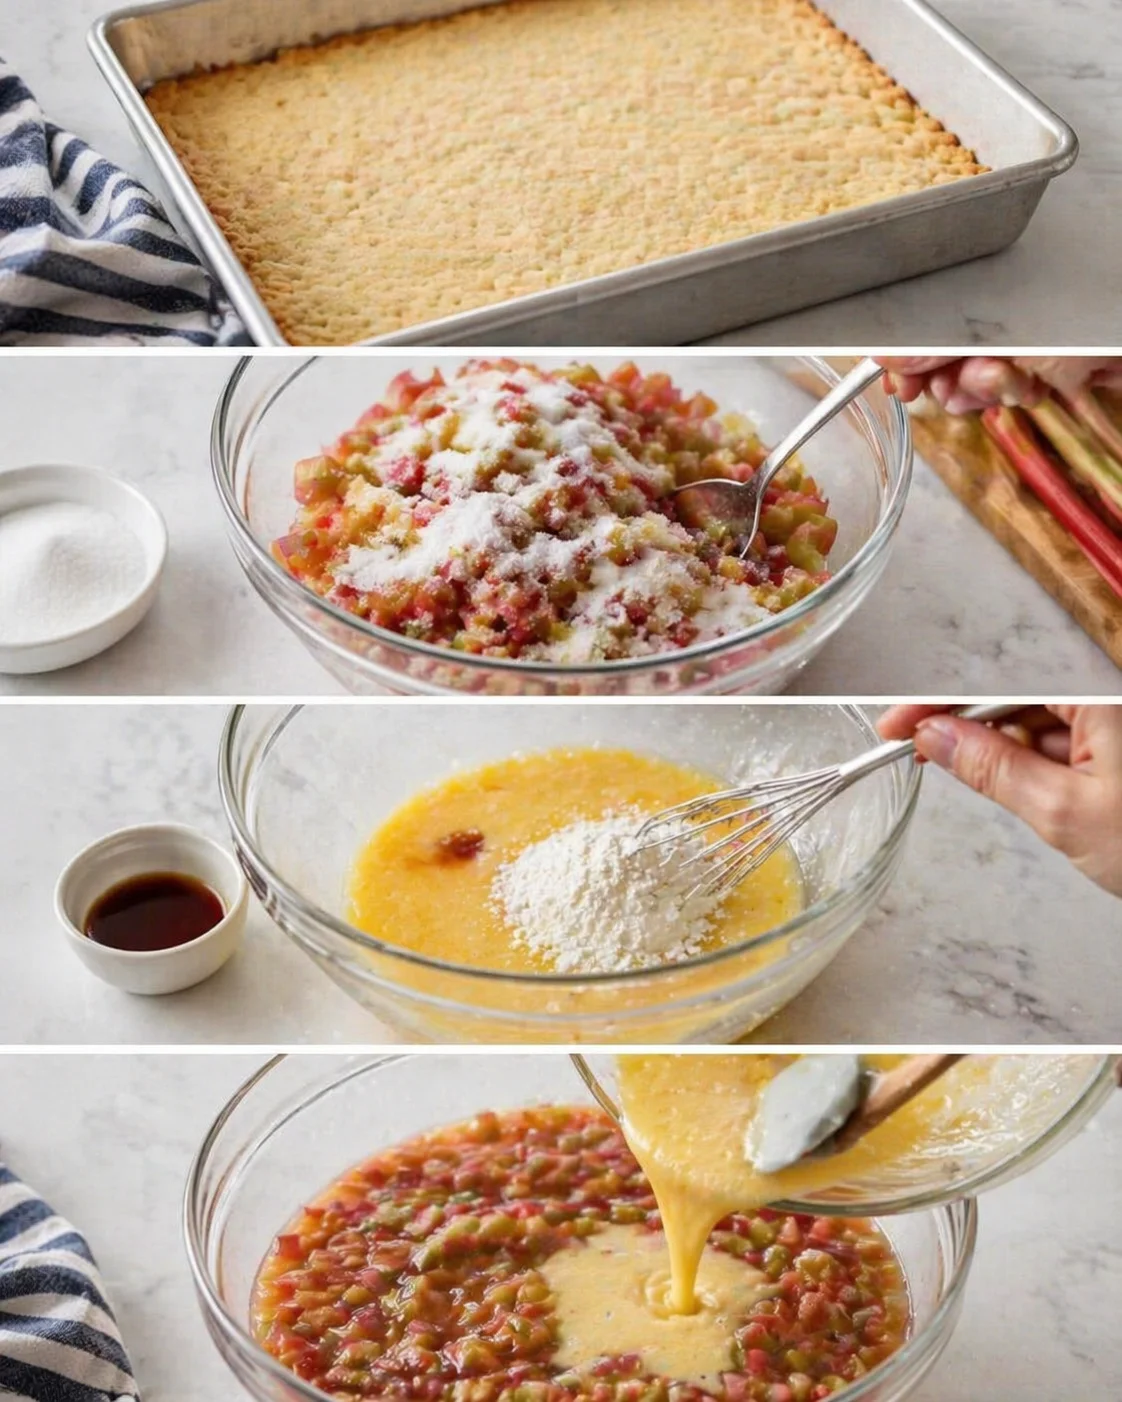
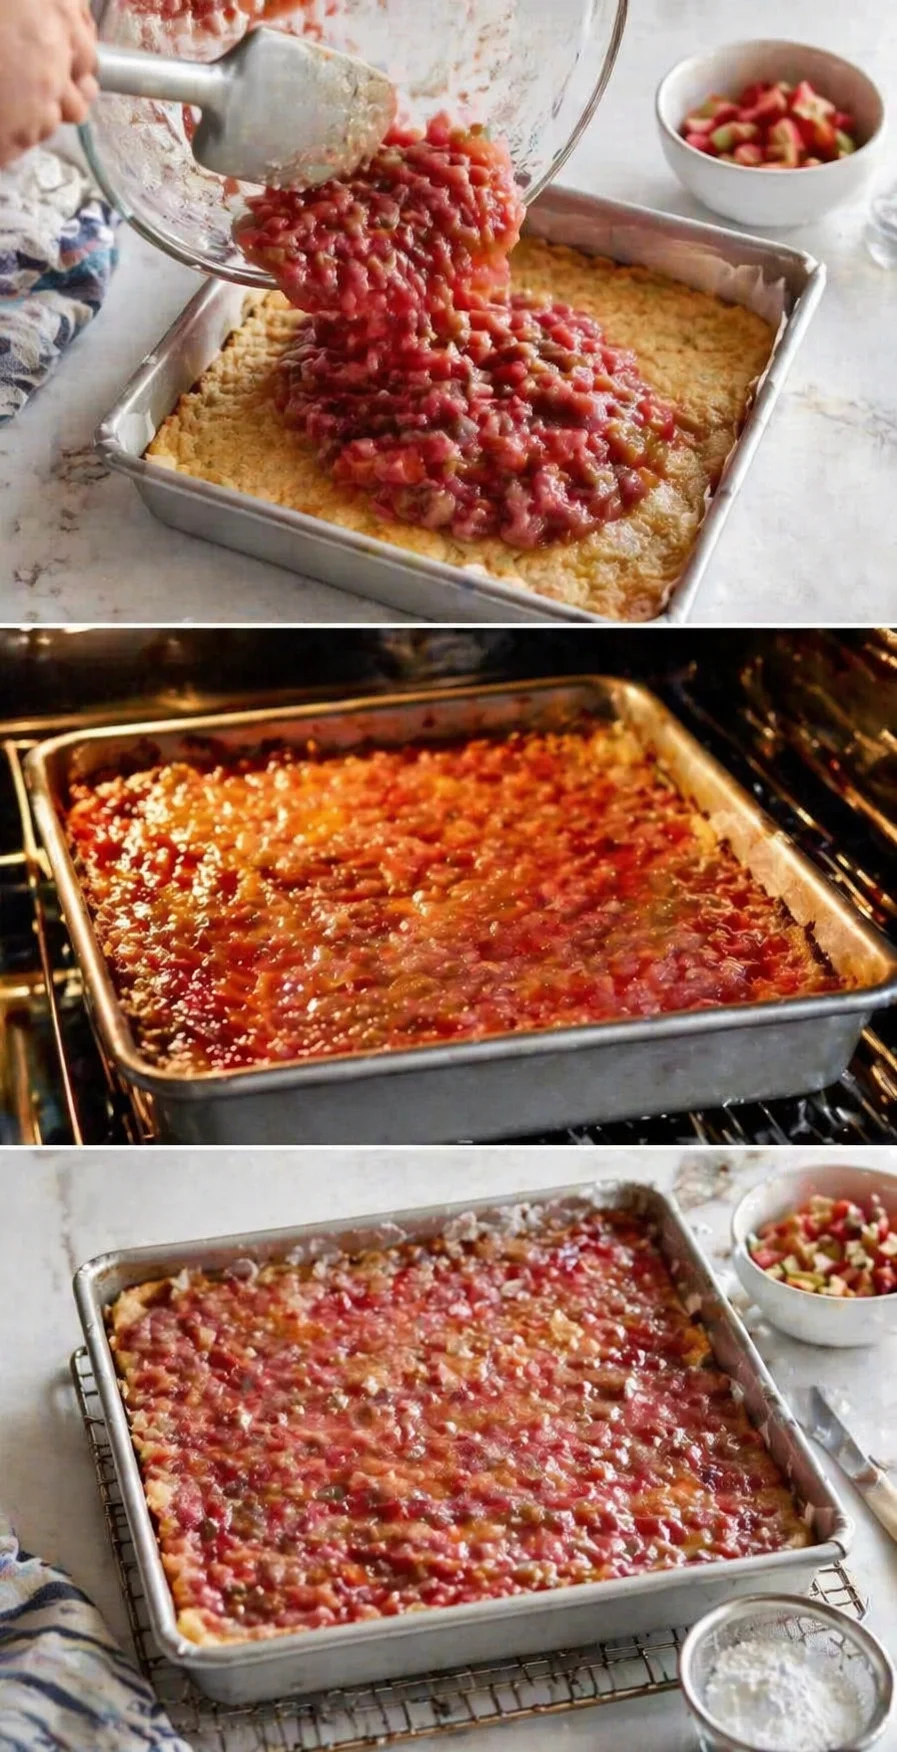
- Pour the rhubarb mixture evenly over the warm crust.
- Return the pan to the oven and bake until the edges are bubbling and the center still jiggles slightly.
-
Let the bars cool completely, then refrigerate for at least 1 hour before slicing.
Expert Tips for Flawless Results
After making these bars more times than I can count, I’ve nailed down some must-know hacks for the best results every time:
- Fresh is best! Choose those crisp, rosy pink rhubarb stalks—they hit the perfect sweet-tart balance and make your filling shine.
- Watch your bake time—take the bars out when the edges are bubbling and the center still jiggles just a little. Trust me, the filling will set up as it cools.
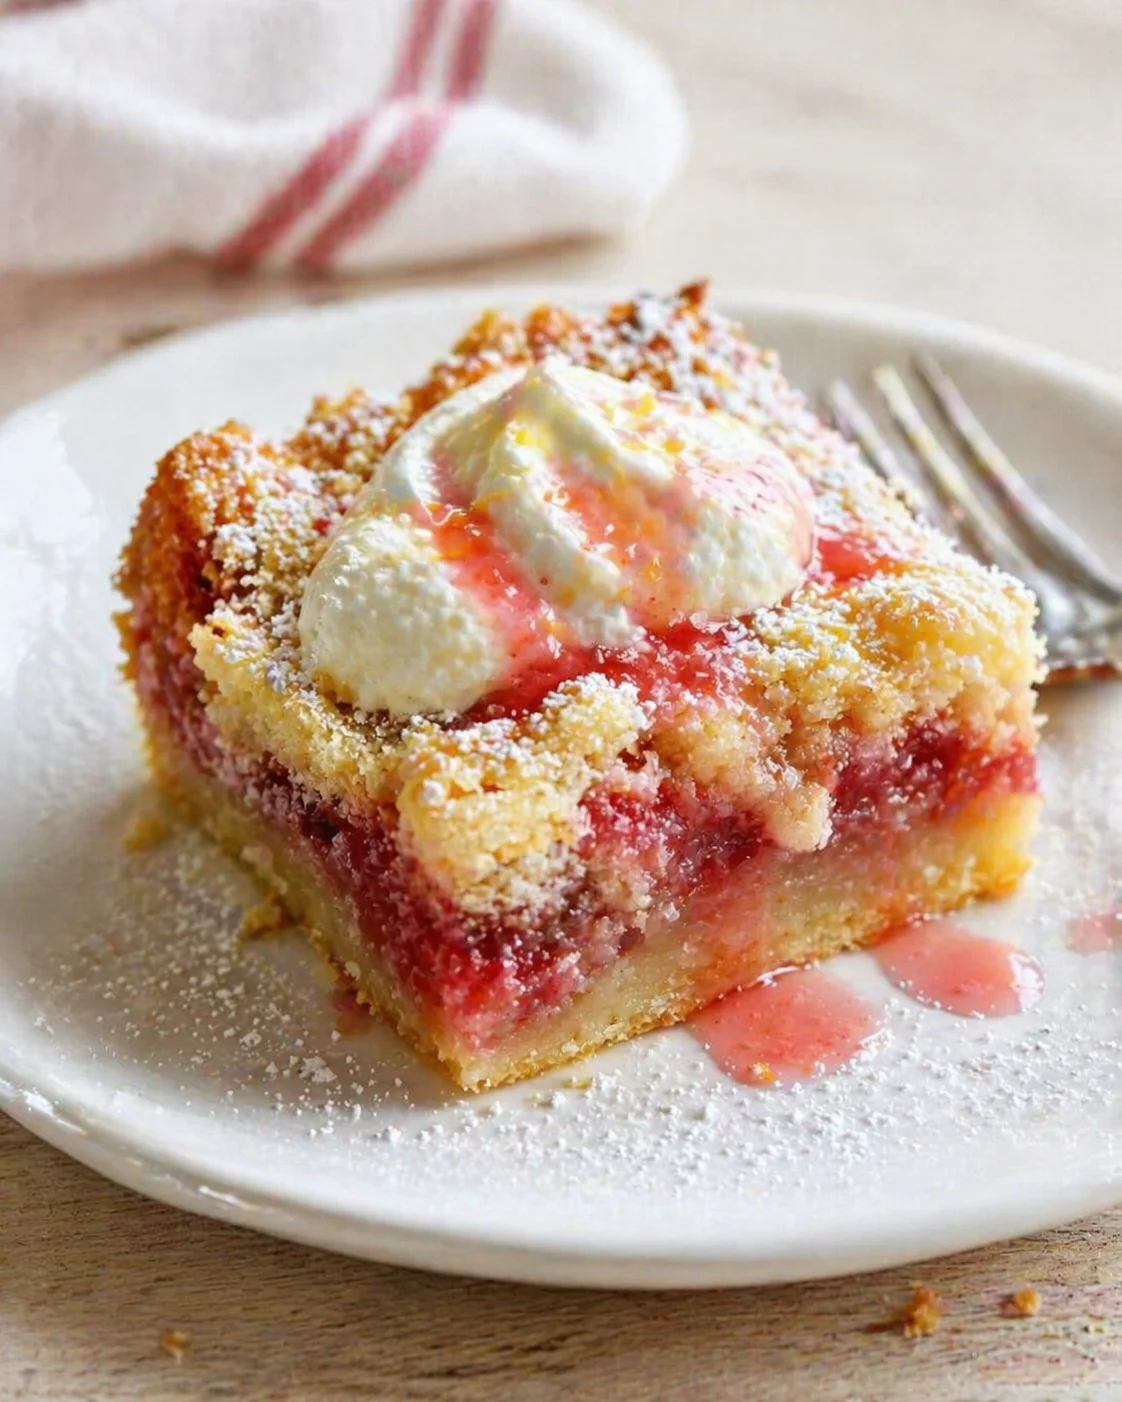
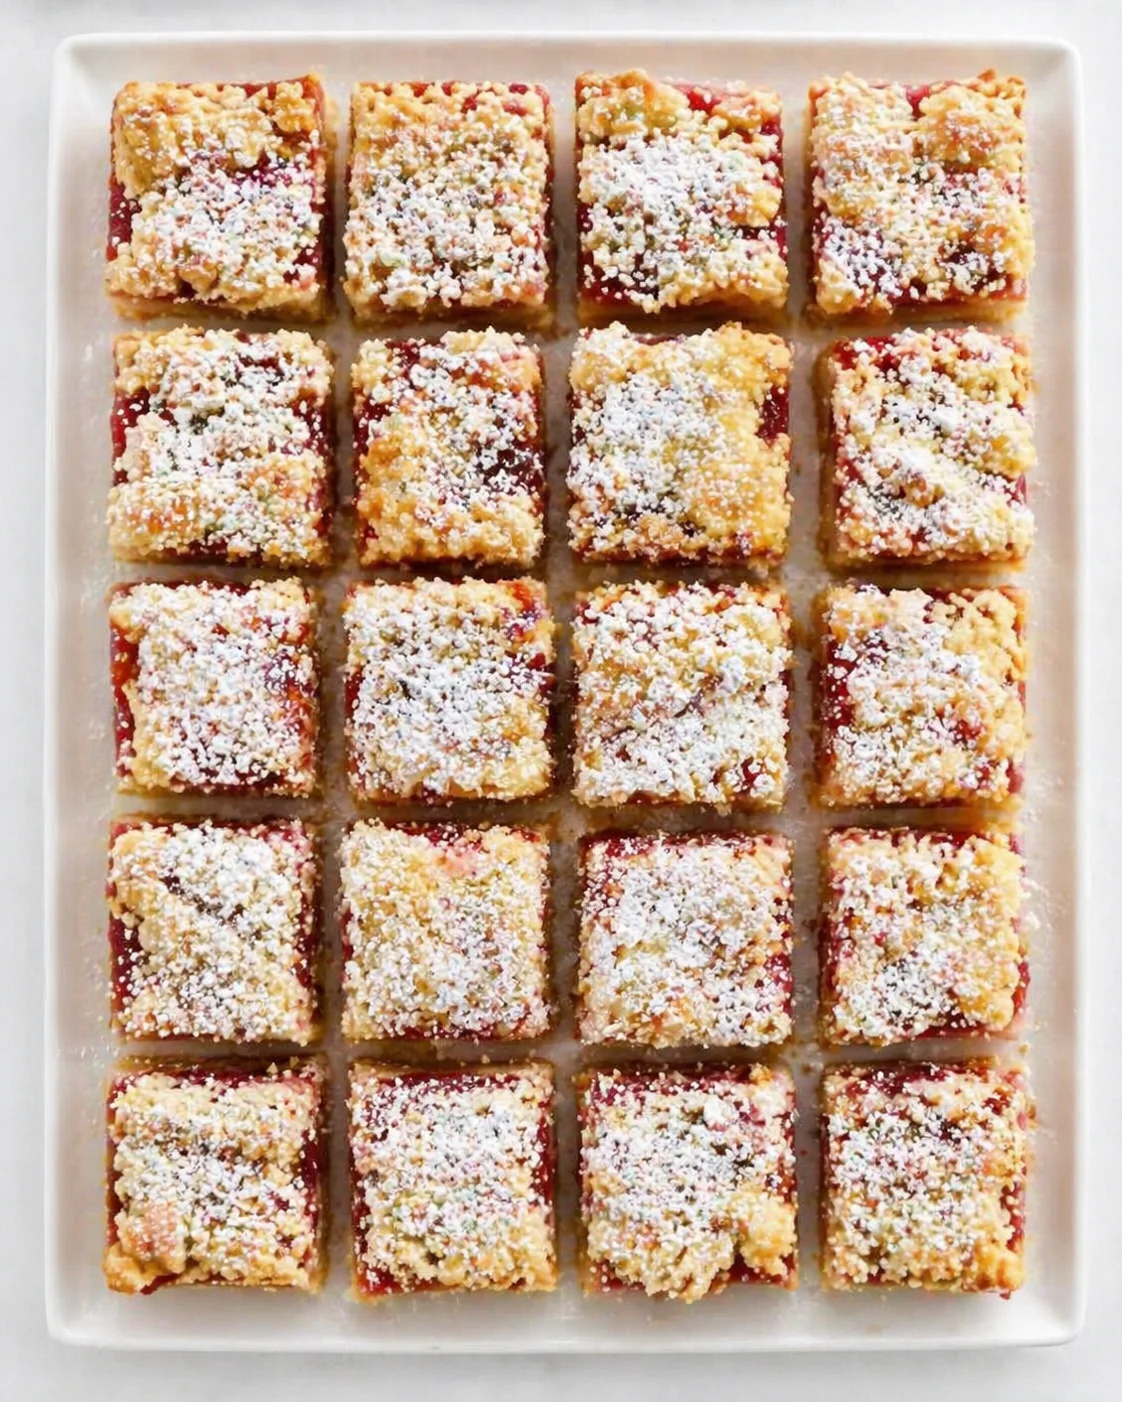
- Chill, chill, chill before slicing—refrigerate for at least an hour. It firms up the filling and helps you get those neat, clean slices that make your friends think you’re a pro baker.
- Powdered sugar dusting right before serving adds that gorgeous bakery touch and a hint of extra sweetness—or swap in a quick vanilla glaze like our classic glazed donuts for a shinier finish.
Believe me, these little tricks turn your simple bars into a showstopper dessert every single time!
Flavor Twists and Add-Ins
Want to switch things up a bit? Here are some of my favorite ways to put a fun spin on these classic bars:
- Strawberry-rhubarb combo: Swap out half the rhubarb for chopped strawberries—their natural sweetness pairs so well with rhubarb’s tang for a delicious flavor dance.
- Streusel topping: Skip the powdered sugar sprinkle and instead add a crunchy oat streusel on top before baking for some crumbly, buttery texture.
- Citrus kick: Stir a bit of fresh orange or lemon zest into the filling. It brightens up the bars with a fresh zing that keeps things lively and refreshing.
Honestly, the original recipe is a winner, but trying these variations keeps me excited to bake them over and over!
Storing and Make-Ahead Tips
Here’s the best news about these bars—they actually taste better after chilling! After baking, let the bars cool completely. Then pop them into the fridge for at least an hour before slicing. The cold helps that rhubarb filling firm up perfectly and makes slicing neat and easy, giving you those tidy edges that impress every time. Store any leftovers (if you’re lucky enough to have some!) in an airtight container in the fridge for up to 5 days. In my house, they rarely last longer than two. Pro tip: pull them out about 10 minutes before serving to let them warm up slightly—this brings out the deep flavors and softens the texture just right.
Common Questions Answered
Can I use frozen rhubarb? Absolutely! Just make sure to thaw it fully and drain well—pat it dry with paper towels to prevent a watery filling. You might want to add an extra tablespoon of flour to help thicken up the extra juices from frozen rhubarb.
How long do these bars keep? These bars do best in the fridge and will happily last up to 5 days—if yours stick around that long! For longer storage, freeze them layered between parchment paper in an airtight container. When you’re ready, thaw them overnight in the fridge for best taste and texture.
Can I substitute eggs? Yes! For a vegan twist, flax eggs work wonderfully. Mix 2 tablespoons ground flaxseed with 5 tablespoons water, let it sit for about 5 minutes until it gels, and then use it just like regular eggs. You’ll get a nice gooey texture that holds the filling together perfectly.
Is there a gluten-free option? Definitely. Swap the all-purpose flour for a 1:1 gluten-free flour blend. A friend of mine swears by almond flour for the crust—just add an extra tablespoon of butter to keep it holding together nicely.
Tangy and sweet rhubarb dessert bars featuring a buttery shortbread crust and a jammy rhubarb filling, perfect for an easy make-ahead treat.
- Prep Time: 15 minutes
- Cook Time: 35-40 minutes
- Total Time: 1 hour 15 minutes plus chilling time
- Yield: 12-16 bars 1x
- Category: Dessert
Ingredients
- 1 ½ cups all-purpose flour (spooned and leveled)
- ½ cup powdered sugar
- ¾ cup cold butter, cubed
- 2 cups chopped rhubarb (about 4 stalks)
- 1 cup granulated sugar
- 2 eggs
- ¼ cup all-purpose flour
- ½ teaspoon vanilla extract
Instructions
- Preheat oven to 350°F (175°C).
- Whisk 1 ½ cups all-purpose flour and ½ cup powdered sugar in a large bowl.
- Cut ¾ cup cold cubed butter into the flour mixture until coarse crumbs with pea-sized pieces remain.
- Grease a 9×13-inch baking dish and firmly press the crust mixture into the bottom.
- Bake the crust for 15 minutes, until the edges start to turn golden.
- Toss 2 cups chopped rhubarb with 1 cup granulated sugar to draw out the juices.
- Lightly beat 2 eggs, then stir in ¼ cup all-purpose flour and ½ teaspoon vanilla extract.
- Gently combine the egg mixture with the sweetened rhubarb.
- Pour the rhubarb mixture evenly over the warm crust.
- Return the pan to the oven and bake until the edges are bubbling and the center still jiggles slightly.
- Let the bars cool completely, then refrigerate for at least 1 hour before slicing.
Notes
Choose bright pink rhubarb stalks for the best flavor balance., Remove bars from oven when edges are bubbling but center still jiggles to ensure proper filling set., Chill bars at least 1 hour before slicing for neat, clean slices., Dust with powdered sugar before serving for an extra touch of sweetness and presentation., Variations include adding chopped strawberries, an oat streusel topping, or citrus zest to the filling., Bars keep up to 5 days refrigerated and can be frozen for longer storage., For vegan option, substitute eggs with flax eggs (2 tbsp ground flaxseed + 5 tbsp water, rested 5 mins)., For gluten-free, replace all-purpose flour with a 1:1 gluten-free blend or almond flour (add extra butter if using almond flour).
Nutrition
- Serving Size: 1 bar
- Calories: Approximately 250 calories per bar
- Fat: 11g per serving
- Carbohydrates: 35g per serving
- Protein: 4g per serving